
Troubleshooting Common 3D Printing Issues: A Maker’s Guide to Flawless Prints
Brick by Brick Bulletin – Issue #9

Hey makers,
We’ve all been there—spending hours designing and slicing a model, only to have the print come out warped, stringy, or completely fail halfway through. It’s frustrating, but every failed print is a learning opportunity.
This week, I’m diving into the most common 3D printing problems and how to fix them, so you can spend less time troubleshooting and more time printing awesome stuff. Let’s get into it!
🔹 Issue #1: Layer Shifting (Your Print Looks Like the Leaning Tower of Pisa)
What It Looks Like:
Your print starts normal, but suddenly, the layers shift sideways, creating a misaligned, stair-step effect.
🛠 Fixes:
✔ Check Belt Tension – Loose belts cause skipped steps; tighten them to ensure smooth movement.
✔ Slow Down Print Speed – Fast movements can overwhelm motors, causing shifting. Reduce speed by 10-20mm/s.
✔ Check for Obstructions – Make sure no wires or debris are blocking the printer’s axis movements.
✔ Secure the Printer Frame – If your printer wobbles, layer shifts are more likely—tighten frame screws!
🔹 Issue #2: Stringing & Oozing (Your Print Looks Like a Spider Nest)
What It Looks Like:
Thin, wispy filament strands appear between parts of your print, like spiderwebs.
🛠 Fixes:
✔ Increase Retraction Distance & Speed – This pulls filament back before moving to a new location, reducing stringing.
✔ Lower the Print Temperature – If filament is too hot, it dribbles out between moves. Try lowering by 5-10°C.
✔ Enable Combing Mode – In Cura or PrusaSlicer, this setting makes the nozzle move inside the print instead of across gaps.
✔ Use a Retraction Test Print – Calibrate retraction settings before printing complex models.
🔹 Issue #3: Warping & Curling (Your Print Peels Off the Bed)
What It Looks Like:
The edges of your print lift off the bed, causing curled, deformed parts.
🛠 Fixes:
✔ Increase Bed Temperature – A warmer bed reduces material shrinkage. Try:
PLA: 60-65°C
PETG: 75-85°C
ABS: 90-110°C
✔ Use a Heated Enclosure – Enclosures trap heat and prevent warping (especially useful for ABS).
✔ Apply Bed Adhesion Aids – Use a glue stick, Magigoo, or PEI bed to improve adhesion.
✔ Use a Brim or Raft – This gives your print extra surface area to grip the bed.
🔹 Issue #4: Under-Extrusion (Gaps & Thin, Weak Layers)
What It Looks Like:
Your print has gaps between layers, looks brittle, or incomplete.
🛠 Fixes:
✔ Check for a Clogged Nozzle – If your filament isn’t flowing smoothly, heat the nozzle to 220°C and manually push filament through.
✔ Increase Flow Rate – In your slicer, bump flow/extrusion multiplier up by 2-5% to get stronger layers.
✔ Check Filament Diameter Settings – Make sure your slicer is set to the correct filament diameter (1.75mm or 2.85mm).
✔ Use a Different Nozzle – If your nozzle is partially clogged, swap it out for a fresh 0.4mm brass nozzle.
🔹 Issue #5: Over-Extrusion (Your Print Looks Blobby & Overstuffed)
What It Looks Like:
Excess filament oozes out, making details look puffy, blobby, or squished together.
🛠 Fixes:
✔ Lower Flow Rate – Reduce flow/extrusion multiplier by 2-5% in the slicer.
✔ Increase Retraction – Over-extrusion can cause blobs during travel moves. Increase retraction distance by 1-2mm.
✔ Lower Nozzle Temperature – If filament melts too fast, it can over-extrude. Try reducing by 5-10°C.
✔ Enable Coasting in the Slicer – This setting stops extrusion slightly before the end of a movement, reducing blobs.
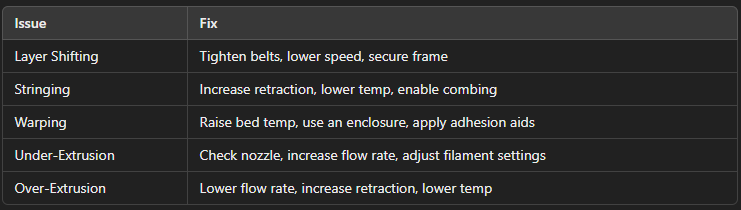
🔥 Bonus: Quick Fix Cheat Sheet
Final Thoughts: Print Failures = Learning Opportunities
Every maker deals with failed prints, but the key is understanding the cause and how to fix it. Whether it’s stringing, warping, or layer shifts, a few adjustments can turn failures into perfect prints.
Got a print fail you can’t figure out? Hit me up—I’d love to help troubleshoot!
Until next time, print smarter, not harder!
Stay creative,
Dillon H.
Brick by Brick 3D Printing